The iPhone has become a necessary gadget in many people' daily lives as smartphones gain popularity. But as time passes, you can observe a slow decline in battery life, which is frequently an indication of battery aging. So how can you tell if you need to replace your battery? If yes, how can you accomplish it in a safe and efficient way? In order to help you better manage the battery life of your iPhone, Phonefix will begin with a battery health check and thoroughly guide you through the process of figuring out whether your iPhone battery needs to be replaced.

I. Why Does Your iPhone Battery Age?
The iPhone uses a lithium-ion battery, which gradually loses capacity over time during charge and discharge cycles. This natural chemical aging process is inevitable. Generally, after one to two years of use, the battery capacity will be significantly lower than its initial level, resulting in reduced battery life, decreased performance, and even unexpected shutdowns. Factors that influence the rate of battery aging include:
· Number of charge cycles: Batteries naturally age after a large number of charge cycles.
· Temperature: Prolonged exposure to high or low temperatures accelerates battery aging.
· Usage habits: Frequent use of iPhone fast charging cable and charging before the battery is completely depleted can also affect battery life.
II. How to Check if Your iPhone Battery Needs a Replacement?
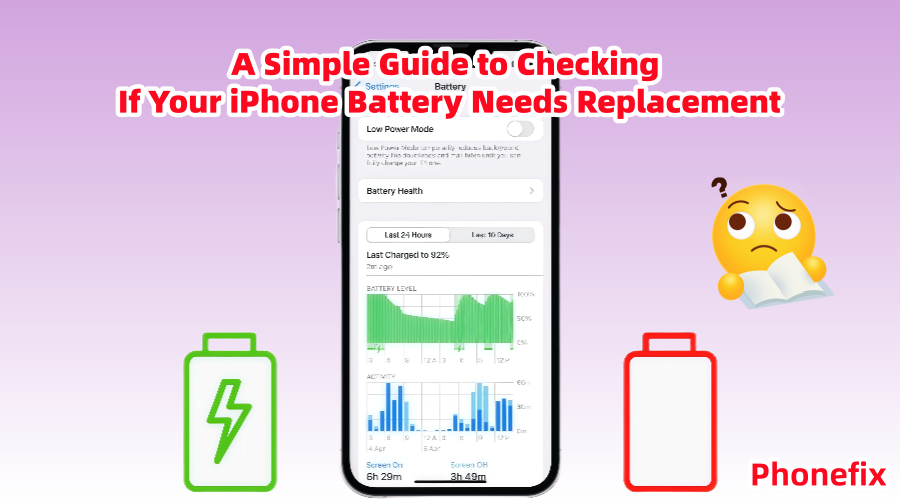
In iOS 11.3 and above, Apple provides users with a "Battery Health & Charging" feature that allows you to view the current health and performance of your battery.
1. Checking Instructions:
· Open the "Settings" app on your iPhone.
· Scroll down and tap "Battery."
· Tap "Battery Health & Charging."
· Check "Maximum Capacity" and "Peak Performance Capacity."
2. Key Metrics Explanation:
a. Maximum Capacity
This percentage shows the difference between the current battery capacity and the capacity of a new battery.
· When you buy a new phone, this percentage should be 100%;
· If it shows below 80%, the battery has clearly deteriorated and should be replaced.
· Below 70%, battery life and performance will be significantly affected, and unexpected shutdowns and other issues may occur.

b. Peak Performance Capacity
This section indicates whether the battery can still support the performance required by the system. If the battery is aging, the system may forcefully reduce the battery's speed to prevent sudden shutdowns.
If you see:
· "Your battery health has significantly degraded";
· or "This iPhone has experienced an unexpected shutdown and performance management has been enabled";
· or a "Service Recommended" message...
This means it's time to replace the battery.
III. What are the Obvious Symptoms of Battery Aging?
Even if you don't check system notifications, you can tell by daily usage:
· Rapid battery drain after a full charge;
· The phone sometimes suddenly shuts down at 20% or 30% battery remaining;
· Slow charging or inability to charge;
· Severe overheating, especially when many background apps are running;
· Noticeable system lag and slow app opening;
· Frequent need to carry a Magnetic Wireless Power Bank.
If you experience any of these symptoms, combined with a "Maximum Capacity" reading below 80%, it's a good bet that your battery is aging and needs to be replaced.
IV. iPhone Battery Replacement Options
You can choose between two methods for replacing your battery:
1. Official Repair
This is the safest and most reliable method. It's performed by professionals, uses the original battery, and maintains partial warranty coverage.
· Advantages: Safe, professional, and guaranteed.
· Disadvantages: Higher price, with some models costing over 500 yuan, and longer waiting times.

2. DIY Replacement
If you have some hands-on experience or want to save money, you can also choose to replace the battery yourself. A wide variety of iPhone accessories and tool kits are available online.
· Advantages: Cost savings and a sense of accomplishment.
· Disadvantages: High risk, complex procedures, and potential damage to the device if not performed properly.
Next, we'll focus on how to replace an iPhone battery yourself.
V. iPhone Battery Replacement Detailed Steps
Warning: Disassembling your device yourself may damage it or render it irreversible. Proceed with caution. If you are unsure of your ability, we recommend entrusting the device to a qualified professional.
Disassembly and Replacement Procedure:
· Step 1: Turn off the phone.
Press and hold the power button to turn off the phone to avoid short circuits during disassembly.
· Step 2: Remove the two pentalobe screws on the bottom.
Use a Pentalobe screwdriver to remove the two screws on the bottom of the iPhone near the Lightning connector.
· Step 3: Heat the edges of the screen.
Use a hair dryer at medium heat to evenly heat the screen border for about 1-2 minutes to soften the waterproof adhesive.
· Step 4: Separate the screen.
Use a suction cup to hold the bottom edge of the screen in place. Gently pull up to create a gap. Insert the opening pick and slowly slide it along the edge to pry the screen apart. Be extremely careful during this step to avoid damaging the cables.

· Step 5: Open and Secure the Screen.
After opening the screen (from the left side), do not apply excessive force. Support the screen with something to support it.
· Step 6: Disconnect the battery and display cables.
Use a Phillips screwdriver to remove the metal shielding plate, exposing the battery and display cables. Use a spudger to carefully disconnect the battery cable, then disconnect the display, digitizer, and other cables.
· Step 7: Remove the old battery.
This step is the trickiest. Apple batteries are secured with strong adhesive strips.
Method 1: If the adhesive strips are exposed, gently pull them out with tweezers.
Method 2: Use a Hot Air Station to heat the back of the battery to soften the adhesive, then gently pry the battery up with a spudger.
CAUTION: Do not puncture the battery or pry directly at the center of the battery with metal tools to avoid fire or explosion.

· Step 8: Install the new battery.
After cleaning any remaining adhesive from the inside, place the new battery in the battery compartment. Secure it with the dedicated battery adhesive strips.
· Step 9: Reconnect the cables and close the screen.
Reverse the disassembly process, connecting the iPhone battery flex cable first, then the display cables. Replace the metal cover and secure with screws. Close the screen from the top down, pressing all sides together until it is securely fastened.
· Step 10: Install the bottom screws and power on the device for testing.
Use a Pentalobe screwdriver to replace the two bottom screws. Press and hold the power button to power on the device and verify that it boots normally, charges, and recognizes the battery.
VI. Post-Replacement Precautions
1. Battery Calibration
After replacing the battery, it is recommended to fully charge it to 100%, then completely drain it until it shuts down, and then fully charge it again. This will help the system calibrate the battery percentage.
2. Enable Optimized Battery Charging
Enable "Optimized Battery Charging" in Settings to slow battery aging.
3. Avoid Fast Charging and Playing While Charging
Use the original charger whenever possible and avoid high temperatures to maximize battery life.
4. Beware of the "Unable to Verify Battery" Message
Some iPhone XR and later models may display the message "Unable to Verify This iPhone Has a Genuine Apple Battery" when replacing a non-genuine battery. This will not affect performance, but the battery health status cannot be checked.
iPhone batteries are consumable components with a limited lifespan. For most users, the safest option is to visit an official Apple or authorized repair center for a replacement. If you're a bit hands-on, you can also try replacing the battery yourself by purchasing genuine iPhone accessories and professional repair tools from "DIYFIXTOOL". This video explains the symptoms of a dead iPhone battery and when to replace it, which you can use as a reference: