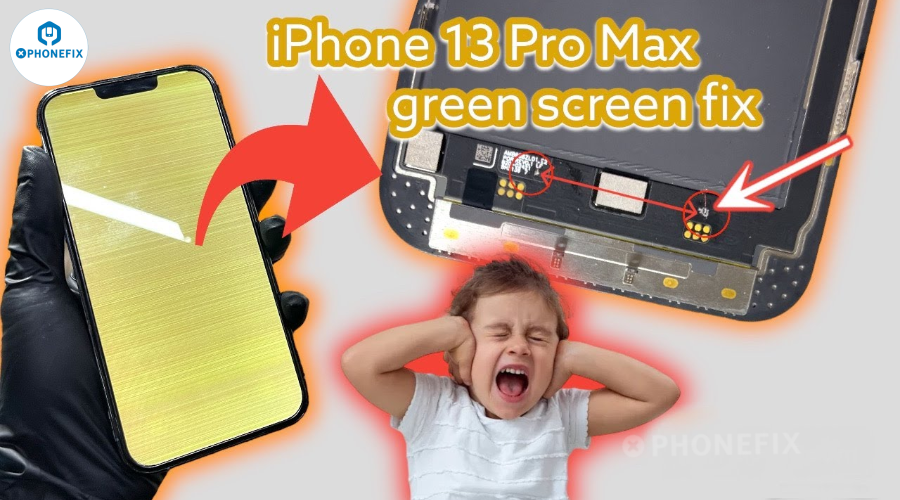
The iPhone 13 Pro Max is a high-end flagship handset that users like for its exceptional performance and lifelike effects. One user's enjoyment was interrupted, nevertheless, by a green screen problem. To help readers better understand iPhone green screen repair processes, Phonefix will examine the root cause of this user's iPhone 13 Pro Max green screen problem as well as the actions involved in fixing it.

I. What's iPhone Green Screen Issue?
iPhone green screen issue typically refers to an iPhone screen displaying a solid green screen for a long period of time after powering on, or even completely suspending the screen. Common symptoms include:
· Screen display abnormalities, but touch and sound function normally.
· The screen flashes green and then recovers, but the issue recurs frequently.
· The green screen issue reappears after replacing the iPhone screen.
· The screen becomes unresponsive after an iOS update
This issue may be caused by a system error, a loose cable, a malfunctioning display driver chip, or poor solder joints on the screen.
II. Professional Repair Procedure: Screen Circuit Jumper Repair
Recently, an iPhone 13 Pro Max user experienced a green screen issue. After receiving the phone, the repair specialist used professional iPhone testing tools to determine that the iPhone 13 Pro Max was most likely experiencing a hardware issue, specifically a broken display cable or damaged iPhone motherboard.
Common hardware issues include:
· iPhone screen FPC (flexible circuit board) internal wire breakage.
· Cold solder joints on the display IC.
· Damaged display cables during the iPhone screen replacement process.
· Abnormal interface voltage (such as no 5V output).
In this case, the repair specialist decided to use a "jump wire repair" method. Let's decipher these steps with Phonefix!

Step 1: Before officially disassembling the device, the repair specialist first disconnected the iPhone's power supply and then used an iPhone-specific pentalobe screwdriver to remove the two iPhone Bottom screws of the iPhone 13 Pro Max.
Step 2: The repair specialist then used a hot air gun to evenly heat the screen frame, recommending a temperature of 80°C. to soften the internal adhesive.
Step 3: The repair specialist then gently pulls the screen with a suction tool and uses a plastic opening pick to slowly separate the edges to avoid damaging iPhone components. After opening the screen, they disconnect the battery and display cable connectors to ensure safety during subsequent inspections and procedures.

Step 4: The repair specialist uses a digital multimeter to measure the voltage at each pin on the motherboard and display cable connectors. They then compare the results with those obtained when the screen is operating normally to identify any abnormal pins that are experiencing no voltage or a short circuit.
Step 5: The repair specialist uses a trinocular stereo microscope to carefully examine the physical condition of the pins and cable solder joints to identify defects such as cracks or oxidation.
Step 6: After confirming that a pin is experiencing no voltage or a short circuit, the repair specialist prepares to connect it to a signal source using a jumper cable.
Step 7: The repair specialist uses a blade to scrape the bare copper area at both solder joints, applies flux, and then applies tin. The specialist then cuts off a section approximately 0.01mm in length. The repair specialist manually secures the enameled wire to the desired soldering point. The specialist then uses a soldering iron tips to quickly spot-solder the two ends, strictly keeping the soldering time under 2 seconds to avoid heat damage.

Step 8: After soldering, the specialist applies UV-curable adhesive to the lead wires and cures them using a UV curing lamp.
Step 9: The specialist rechecks the jumper wires for continuity and no shorts to ensure a reliable repair.
Step 10: After the repair, the specialist reinstalls the display cable and battery connector, ensuring they are securely connected. The specialist then closes the display and powers on the device, checking for normal display quality. The specialist also tests core functions such as touch response, use Face ID programmer to check whether core functions such as Face ID recognition, and auto-brightness.

Step 11: After confirming all functions are functioning properly, the specialist carefully seals the case with genuine waterproof adhesive and tightens all screws to the specified torque. This completes the complete green screen repair process.
Tips: The following video demonstrates common repair techniques for iPhone 13 Pro Max green screen issues. The repair process involves identifying the faulty pins on the screen and connecting them using jumper wires, effectively bypassing the faulty circuit. The video provides a step-by-step guide to performing this repair, including the tools and materials required.III. Repair Tips and Precautions
· Control soldering temperature and time: Soldering for too long or at too high a temperature can burn the cable.
· Maintain a steady hand: Jumper operations should be performed under a microscope to avoid breaking loose wires.
· Take precautions against static electricity: Static electricity can damage the motherboard chip. Please wear an anti-static wrist strap during repairs.
· Record jumper locations: After repair, it is recommended to take photos of the jumper pins for future reference.
· Perform a thorough test: including the display, touchscreen, sensors, speakers, and other functions.
The green screen issue on the iPhone 13 Pro Max may be caused by a system error, hardware failure, or improper third-party repair.
A jumper repair is a quick and economical solution if it turns out that the issue is a damaged ribbon wire or a bad logic board connection. However, it is best left to professional repair staff and requires a high level of technical expertise. Please keep following the official China Phonefix account, where you can get free mobile phone repair news and expert mobile phone repair tools.