In the realm of smartphone repair, iPhone battery replacement is one of the most common service requests. As devices age, issues such as declining battery capacity, unexpected shutdowns, or charging failures inevitably arise. Faced with these challenges—whether you are a DIY enthusiast or a professional repair technician—possessing the right iPhone battery repair tools is the key to ensuring both safety and efficiency.

I. Why Are the Right Repair Tools Crucial for iPhones?
The internal structure of an iPhone is incredibly intricate; its compact design means that even the slightest slip can result in damage to the motherboard or flexible cables. Using substandard or ill-fitting tools not only increases the difficulty of the repair but can also lead to:
· Component Damage: Stripped screws or broken screen brackets.
· Safety Risks: Accidental battery puncture leading to fire hazards.
· Repair Failure: Inability to correctly read or recognize battery health data.
Therefore, choosing professional-grade tools serves as the cornerstone of every successful repair project.
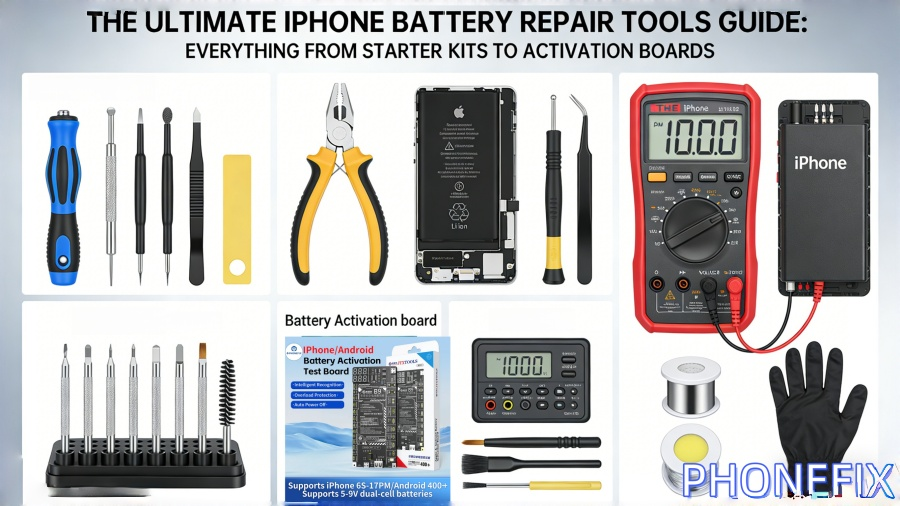
II. Essential iPhone Repair Toolkits (Beginner to Advanced)
A standard iPhone repair toolkit should contain all the basic equipment required to handle fasteners, adhesives, and sensitive electronic components.
1. Core Hand Tools
· Pentalobe Screwdriver (P2): Specifically designed for removing the five-point screws located at the bottom of the device.
· Tri-point (Y000) and Phillips #000 Screwdrivers: For handling the complex internal Y-shaped and cross-head screws.
· Suction Cup and Screen Opening Tools (Pry Bars): Used to safely lift the screen without damaging the LCD or OLED module.
· Ultra-thin Metal Pry Picks: For slicing through the waterproof adhesive along the edges of the device.
2. Auxiliary and Organization Tools
· Magnetic Work Mat: Since screws are tiny and vary in size during a repair, a magnetic mat prevents parts from getting lost.
· Heating Pad or Hot Air Gun: To soften the strong adhesives located behind the screen and battery, thereby reducing resistance during disassembly.
III. Battery Activation Boards: The Core Essential for Professional Repair
For advanced repairs or professional repair shops, simple physical replacement is often not enough. A Battery Activation Board is an essential electronic tool for increasing the success rate of device repairs.
1. Why is a Battery Activation Board necessary?
Due to Apple's encryption system (BMS), replacing a battery may trigger an "Unknown Part" warning on the device or prevent the "Battery Health" percentage from being displayed. The primary functions of a Battery Activation Board include:
· One-Touch Activation: Waking up batteries that have entered a dormant state (under-voltage) due to prolonged storage.
· Parameter Testing: Real-time monitoring of voltage, current, and battery cycle count.
· Efficiency Enhancement: Supporting multiple iPhone models (e.g., iPhone 13 through iPhone 17 series), enabling technicians to quickly diagnose the condition of a battery.

IV. iPhone Battery Repair Standard Operating Procedure (SOP)
To achieve optimal repair results, please follow these structured steps:
1. Preliminary Diagnosis: Check the "Battery Health" data within the device's Settings. If the reading is below 80% or if there is visible swelling/bloating, immediate replacement is recommended.
2. Power Off & Heating: After completely powering down the device, use a heating pad to warm the edges of the device to 60°C – 70°C.
3. Safe Disassembly: Use a suction cup to create a gap, then use a plastic spudger to slowly slice along the edges to separate the components. Pay close attention to the opening direction of the iPhone (which acts like a hinged door) to avoid tearing any flex cables.
4. Disconnect Power: Prioritize removing the battery connector shield and disconnecting the battery flex cable to cut off power to the motherboard, thereby preventing electrostatic discharge (ESD) damage.
5. Remove Adhesive Strips: Use tweezers to roll up the battery pull-tabs (adhesive strips) and pull them out smoothly and steadily.
6. Testing & Reassembly: Before final installation, use the Battery Activation Board to check the status of the new battery; once confirmed to be in good working order, proceed with reassembly.
For users with a certain level of manual dexterity and a complete toolkit, replacing an iPhone battery can be a cost-effective DIY project. However, if you are dealing with newer models (such as those featuring complex Face ID structures) or if the repair requires micro-soldering tasks, it is safer to opt for professional repair services or to invest in higher-end professional equipment (such as tools from the i2C or JCID series). The quality of your tools ultimately determines the upper limit of your repair capabilities. Acquiring high-quality iPhone battery repair tools from China Phonefix not only boosts your work efficiency but also provides a dual layer of protection for the safety of your devices.


