Many consumers adore the Google Pixel Fold, a highly inventive foldable phone, because of its distinctive folding shape and excellent display. However, foldable phones require special attention when being repaired because of their intricate structure. It could be necessary to replace the inner screen assembly if your Pixel Fold has display problems or inner screen damage. This Phonefix article explains how to disassemble and replace your Google Pixel Fold's inner screen assembly, assisting you in fixing it if needed.

I. Preparation
Before you begin replacing the inner screen, ensure you are fully prepared:
1. Back Up Your Data
Replacing the inner screen may require disassembling internal components and could result in data loss. To avoid losing important data, it is recommended that you back up all data on your phone first.
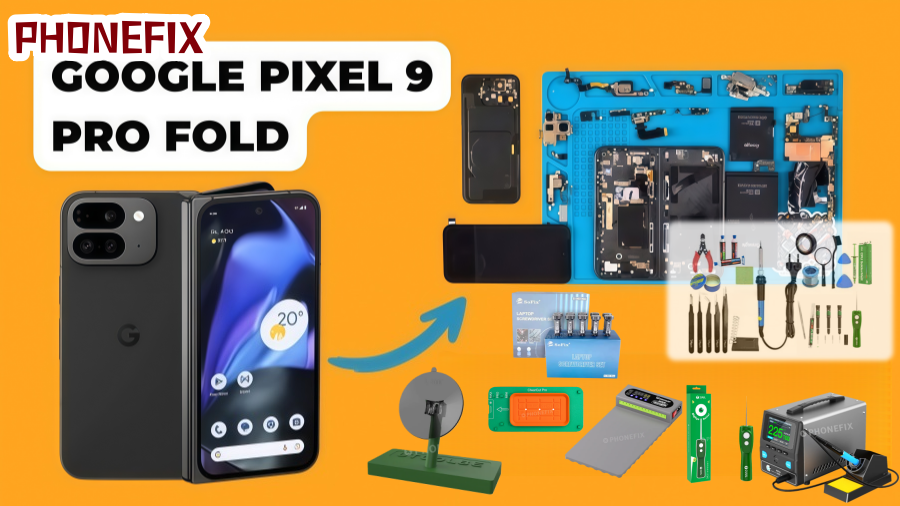
2. Required Tools
Replacing the inner screen requires a range of specialized tools. If you do not have these tools, it is recommended to purchase a professional disassembly tool kit to avoid damaging your device. Here are some essential tools:
· Suction Cup Handles: Helps separate the screen from the body.
· Heating Pads: Softens the adhesive for easier disassembly.
· Precision screwdriver: Used to remove internal screws.
· Pry tool: Inserted into gaps to separate the screen and frame.
· Anti-static wrist strap: Prevents static electricity from damaging internal components.
· Suction pliers: For more delicate operations.
3. Prepare the work area
Ensure your work environment is clean and well-lit. It's best to work on an anti-static mat to reduce static damage to the phone's internal components.
II. Disassembly Process
1. Turn off the phone and disconnect the power
Before starting repairs, ensure the phone is turned off. Press and hold the power button until the power off screen appears, then select "Power off." Disconnecting the power prevents any damage to the phone's internal circuitry during disassembly.
2. Remove the back cover
First, gently pull up the phone's back cover using a suction cup handle. Be careful to avoid damaging the screen or back cover. Use an iOpener or heating pad to slightly heat the phone's back cover to soften the adhesive holding the screen in place, making disassembly easier.
Note: Use a pry tool or thin metal pry bar to slowly pry open the back cover. If you feel any resistance, continue heating the back cover until it is easily removed.
3. Disconnect the Battery Connector
After removing the back cover, the first step is to disconnect the battery connector. Before proceeding to the next step, ensure the battery is disconnected from the motherboard. Use a precision screwdriver to remove the screws securing the battery connector, then carefully pry it open.
Note: After disconnecting the battery, the phone will be completely powered off, and you can safely proceed with the following disassembly steps.

4. Disconnect the Motherboard and Other Connectors
Next, use a screwdriver to remove the screws securing the motherboard. Carefully remove the connectors on the motherboard, especially the display connector. Motherboard disassembly requires extreme care to avoid damaging other components.
Note: Once the motherboard and other connectors are removed, the phone's internal screen can be freely separated. At this point, you need to confirm that all connectors between the screen and internal components are disconnected.
5. Disconnect the Internal Screen Assembly
This step is crucial. Before disassembling the internal screen assembly, ensure it is completely disconnected from the motherboard. The inner screen and folding section are typically held together by strong adhesive, so you'll need to carefully separate the screen from the body using a pry tool and suction cup handles.
Note: Because the Pixel Fold's screen is made of delicate electronic components, extra care is required during disassembly. By heating the adhesive and gradually prying open the screen, you should be able to successfully remove the inner screen assembly.
6. Installing the New Inner Screen
After removing the damaged inner screen, the next step is to install the new one. Carefully align the new inner screen, ensuring all connectors are correctly connected. Re-secure the inner screen's connection points with a screwdriver, ensuring a stable connection.
Note: During installation, ensure all contact points between the screen and the body are secure; otherwise, it may affect the screen's display quality.
7. Reassembling the Device
After installing the inner screen, reassemble the phone. First, connect the battery, then reinstall the motherboard. Ensure all connectors are correctly connected and tighten all screws with a screwdriver. Finally, use a pry tool or suction cup handle to reinstall the phone's back cover onto the device. Press to ensure the back cover is firmly attached.
III. Testing and Inspection
After completing all disassembly and assembly operations, be sure to test the phone to ensure everything is functioning properly. Perform the following checks:
1. Power-on Test: Press and hold the power button to ensure the phone powers on normally, the screen displays clearly, and there are no black screens, freezes, or other issues.
2. Touch Test: Check the touchscreen sensitivity to ensure normal touch response.
3. Display Test: Carefully check the screen display for any light leakage, dark spots, or other display abnormalities.
4. Recheck Screws and Connectors: Ensure all screws are tightened and all connectors are securely connected to prevent loosening during disassembly.

IV. Precautions
1. Static Electricity Issues
During disassembly, static electricity may damage the phone's internal circuitry. To avoid this, it is recommended to wear an anti-static wrist strap. This will effectively prevent damage to the phone's components caused by static electricity.
2. Careful Use of Tools
Throughout the repair process, be careful when using tools such as pry tools and suction cup handles to avoid excessive force that could damage other components, especially the display screen.
3. Ensure Correct Screen Installation
The Pixel Fold's internal screen is a high-precision component. During installation, ensure all connectors are aligned correctly. Incorrect installation may cause display problems or other malfunctions.
4. Use Genuine Parts When Replacing Components
When replacing the internal screen, it is recommended to use genuine parts to ensure display quality and device stability. Non-genuine parts may not be compatible with the device, affecting the user experience.
It is not an easy procedure to replace the internal screen of the Google Pixel Fold; professional tools and careful operation are needed. If you want to replace the internal screen yourself, China Phonefix offers top-notch professional repair tools, such as screwdrivers, suction cups, and pry tools, to make the operation go more smoothly. If you'd like a more intuitive understanding of how to replace the inner screen component of your Google Pixel Fold, you can watch the following video tutorial to help you better understand the process.


