Apple's newest smartphone, the iPhone 14 Pro Max, has cutting-edge hardware and software. Even such a high-end gadget is susceptible to regular issues, though. One of the primary factors impeding regular phone use is motherboard problems. This Phonefix article offers a thorough motherboard repair guide for the iPhone 14 Pro Max to assist you comprehend the procedure and present some fundamental repair techniques.

I. When is Motherboard Repair Necessary?
Motherboard repair may be necessary for your iPhone 14 Pro Max in the following situations:
1. Phone Won't Power On (No Power)
If the phone is completely unresponsive and cannot be powered on for an extended period, it may be due to a fault in the power management circuitry on the iPhone motherboard.
2. Phone Won't Charge
If the phone cannot charge or is not properly recognized while charging, it may be due to a fault in the battery or charging controller-related circuitry.
3. Display Issues (No Image or Screen Lag)
If the screen display is abnormal, such as no image, a distorted image, or lag, it may be related to a problem with the graphics processing unit (GPU) or related circuitry on the motherboard.
4. Network Connection Interruption
An unstable network connection on your phone, unable to connect to Wi-Fi or make calls, may indicate a malfunction in the communication circuitry or network module on the motherboard.
II. Repair Process (Professional Level)
Motherboard repair is a highly complex task involving sophisticated circuit analysis and micro-soldering techniques. Below is a detailed introduction to each step of motherboard repair, including the necessary tools and methods.
Step One: Troubleshooting
First, technicians need to perform a preliminary diagnosis to determine the root cause of the malfunction. Common causes include short circuits, power supply failures, or integrated circuit problems.
1. Using a Power Supply Tester
A power supply tester can check if the power rails on the motherboard are functioning correctly, helping to diagnose short circuits or other power-related issues.
2. Thermal Imaging Inspection
A thermal imaging camera is used to detect areas on the motherboard that are overheating. Short circuits or faulty components often cause abnormal temperatures. With a thermal imaging camera, technicians can quickly locate the faulty component.
3. Circuit Board Viewing Software
This software connects the device to a computer to monitor the circuitry on the motherboard in real time, aiding technicians in fault location.

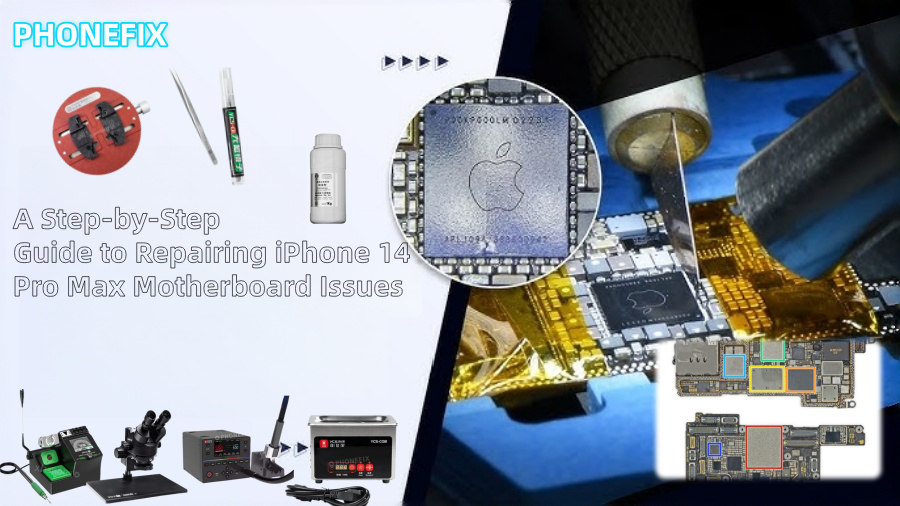
Step Two: Separating the Motherboard
The iPhone 14 Pro Max's motherboard uses a dual-layer design, commonly known as a "sandwich" structure. Therefore, during repair, the two layers of the motherboard must be carefully separated for internal repairs.
1. Heating with a Hot Air Gun
Because the motherboard is secured with strong adhesive or solder, a hot air gun is needed to heat it. The heating temperature is typically around 150°C to ensure even heating and avoid damaging the motherboard.
2. Gently Separating the Motherboard
After heating, use a specialized tool (such as a plastic pry bar) to gently separate the two layers of the motherboard. This process requires extreme care, as excessive pulling or improper handling can damage the motherboard or cause components to detach.
Step Three: Identifying Faulty Components
After disassembling the motherboard, technicians need to inspect capacitors, integrated circuits, and other micro-components to identify the damaged parts.
1. Using Voltage Injection Technology
Voltage injection technology helps technicians inject voltage into the motherboard to detect abnormal currents or short circuits in the circuitry.
2. Cryo-Spray Method
Cryo-spray is a method for quickly identifying faulty components. Technicians will spray a cooling agent onto suspected faulty components. If a component is faulty, its temperature fluctuations typically affect the equipment's operation; the cooling spray can quickly identify faulty components.
3. Manual Component Inspection
Use a microscope to inspect each component on the motherboard individually, checking for obvious damage, burn marks, or looseness. Damaged components usually need to be replaced.
Step Four: Replacing Damaged Components
Once the faulty component is identified, the next step is to replace it. Common components requiring replacement include capacitors, power integrated circuits (ICs), and charge controllers.
1. Removing Damaged Components with a Hot Air Gun
Heat the damaged component to melt its solder joints, then gently remove the component using a desoldering pump or tweezers.
2. Cleaning the Pads
Clean the pads with soldering cleaner, ensuring the soldering area of the new component is free of oxides or impurities.
3. Soldering the New Component
Place the new component in the correct position and solder it using a hot air gun. Use low-melting-point solder to avoid overheating and damaging other components.
4. Check Solder Quality
Carefully inspect the solder joints using a HD trinocular microscope to ensure they are firmly soldered and free of cold solder joints.

Step Five: Reassemble the Motherboard
After replacing all damaged components, the next step is to reassemble the motherboard. The reassembly process involves resoldering the two layers of the motherboard together and performing necessary reflow soldering.
1. Solder Ball Placement and Reflow Soldering
Using solder balls and reflow soldering technology, the two layers of the motherboard are soldered together. Reflow soldering effectively heats all solder joints to the appropriate temperature, ensuring a strong connection.
2. Check Soldering Results
After assembly, check the solder joints and circuit connections for stability, ensuring all components are securely connected.
Step Six: Testing and Verification
Finally, after completing the motherboard repair, technicians need to perform comprehensive testing to ensure all functions are working properly.
1. Power-On Test
Test the motherboard's basic functions, including power-on, charging, and Wi-Fi connectivity. Ensure there are no short circuits or other faults.
2. Screen Display and Touch Test
Check the screen display for normal operation, ensuring the displayed image is clear and free of distortion. Simultaneously test the touch functionality to ensure screen responsiveness.
3. Battery and Charging Function Test
Test the battery to ensure it charges normally, without overheating or abnormal charging.
4. Network Connectivity Test
Test Wi-Fi, Bluetooth, and cellular data connections to ensure stable network signal.
III. DIY Repair vs. Professional Service
While some DIY enthusiasts may wish to attempt to repair iPhone 14 Pro Max motherboard issues themselves, due to the complexity and high risk involved, we strongly recommend seeking professional repair services. DIY repairs may result in more serious damage and offer no guarantee of repair. If your iPhone 14 Pro Max experiences a motherboard problem, the safest option is to contact a professional iPhone repair service, especially those offering mail-in repair services. This ensures your device receives proper diagnosis and repair.
Repairing the motherboard of the iPhone 14 Pro Max is an extremely difficult process that requires careful soldering and circuit repair. China Phonefix provides expert motherboard repair services with cutting-edge tools and a skilled technical staff that can securely and effectively fix your smartphone if you're not sure how to move forward. By using their services, you can make sure your equipment is fixed correctly and steer clear of needless risks.


