Whether you have shattered the glass, broken the Apple watch screen, or have a dead LCD display; one of our Apple Watch screen replacements will have your device looking like new again!

Follow this guide to replace a broken, cracked, or defective Apple LCD Screen on your Apple Watch Series 3.
Before the replacement
If possible, to reduce the likelihood of problems, delete all your Apple Pay account info before the replacement, and then re-enter it with the new display installed.
This guide shows the procedure on the standard, GPS-only version of the watch, but the cellular/LTE version is similar.
Update your Apple Watch to watchOS 5 or later (and the paired iPhone to iOS 12 or later) to avoid pairing issues after a display replacement.
1. Power Off the Broken Apple Watch
Press and hold both the side button and digital crown simultaneously. Continue holding while the Apple Watch reboots.

When you see the Apple logo, release the digital crown. Continue holding the side button. When the Apple logo disappears, release the side button.

2. Apply heat
Remove the watch band as needed to provide more control as you make repairs. Using a QUICK 861DW hot air station to heat the face of the watch until it's slightly too hot to touch. Soften the adhesive holding it to the case and heat screen enough to pry it off.

3. Remove the broken Screen
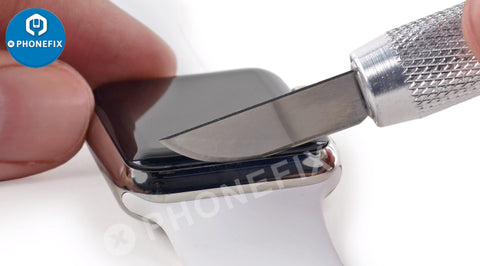
1. Place the edge of a Curved Blade into the thin gap between the display and the outer case. Start at the short side of the display, closest to the digital crown.
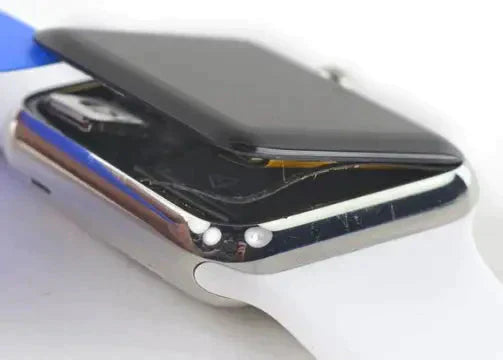
2. Remove the blade and insert the thinner edge of an opening tool into the gap. Push the opening tool into the gap, using your thumb as a pivot to lift the display open a bit farther.
Insert an Opening Tools the display and carefully separate the Force Touch gasket from the display. Slide the pick around the display to separate the adhesive between the Force Touch gasket and the display.
3. Open the display, and use tweezers to peel off the adhesive between the display and the Force Touch gasket. Thread the adhesive around and behind the display cables to get it off completely.
Remove the tri-point screw securing the metal cover plate. Open the plate all the way to unhinge the two flaps. Then close it halfway to remove it completely by lifting it out.

Disconnect the Force Touch gasket and fold it out of the way first, and pry battery connector straight up. Bend the connector up slightly to make sure it does not make contact by accident. Peel off the tape covering the display cable connectors.

Use a pry tool to unlock the first of the three ZIF connectors by prying up the small black locking flap opposite the cable. Pry up the locking flaps on the remaining two ZIF connectors.
Use a pair of tweezers to disconnect the Apple Screen Flex Cable by gently pulling them out. Remove and change a new display.

Reconnect the Force Touch gasket and battery flex cable by pressing their connectors straight down until they click into place.

Align the screen and press it down firmly onto the adhesive. Apply heat from heat gun, or hair dryer to help set the adhesive.
Wrapping the watch with a couple rubber bands, or placing it under a heavy book or two.

Check
1. Power on your watch and make sure Force Touch works correctly—a hard press on the screen should cause the watch to vibrate, and the press should register on the display.
2. Place the metal plate covering the battery connector back in its original position.
You need prepare these repair tools before proceeding:
Safety Glasses
Protective Eyewear
Curved Razor Blade
Opening Picks
Opener
Plastic Opening Tools
Tweezers
1mm Flathead
Tips:
1. Please try to handle the repair or replacement work in a dry and dust free environment without direct sunlight.
2. Be careful not to apply too much pressure, as this might cause the knife to slip and cut you, or damage the watch.
3. Wear eye protection. The knife or glass may break, sending pieces flying.
No matter which Apple Watch generation you have, all our screens have the same look and feel as the original after you replace it. When you encounter with "!" Error and red exclamation mark, AWRT Adapter Apple Watch Restore Tool can deal with. Beside, it can remove S1/S2/S3 iCloud and the restore/upgrade and repair software, tackling the most iwatch trouble.


