In an era where smartphones have become our "digital organs," a shattered screen is undoubtedly a disaster. For those attempting to repair a phone screen themselves for the first time, the keys to success are patience, proper preparation, and the right tools. Phonefix will provide a detailed guide on how to perform DIY phone screen repairs, offering first-time fixers a set of essential tips and important precautions to keep in mind.

I. The Essential Tool Kit
Before unscrewing the first screw, remember this: ensure the phone's power has been completely shut off, and bear in mind that the complexity of a phone's internal components far exceeds what you might imagine.
1. Core Repair Tool Checklist
As the old adage goes: to do a good job, one must first sharpen one's tools. Do not attempt to use ordinary household Phillips screwdrivers; to deter unauthorized disassembly, phone manufacturers utilize a wide variety of specialized screw specifications.
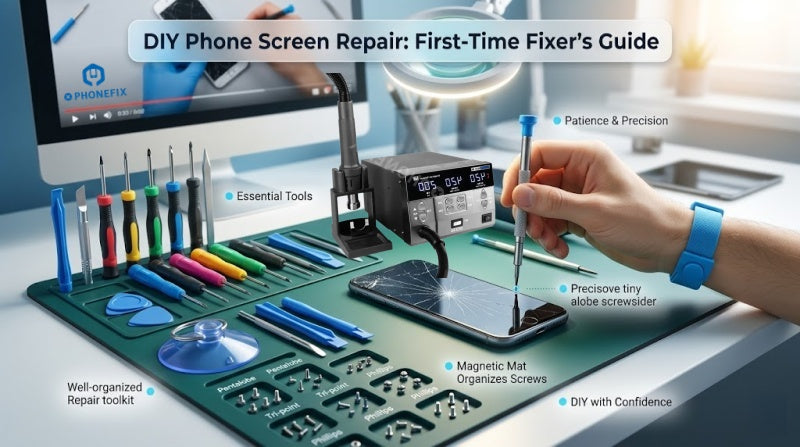
· Specialized Screwdrivers Set: Pentalobe screwdrivers (for the bottom bezel) and Tri-point or Phillips screwdrivers (for internal brackets).
(Note: Unless absolutely necessary, avoid using metal pry tools to prevent scratching internal components or causing short circuits).
· Prying System: Plastic spudgers and anti-static opening picks.
· Suction Tools: Ideally, use a dual-handle suction tool (such as the iSclack); it offers better control over the applied force than a single suction cup, preventing you from pulling too hard and severing the flex cables.
· Heating Equipment: A hot air gun or a powerful hair dryer, used to soften the adhesive sealant along the edges of the screen.
· Magnetic Project Mat: This is the most critical error-prevention tool for beginners. A phone contains dozens of screws of varying lengths; accidentally inserting a long screw into a short hole can result in permanent damage to the motherboard.
2. Safety and Protection
· Anti-Static Measures: Wear an anti-static wrist strap or touch a grounded metal object before you begin working. Electrostatic Discharge (ESD) is a silent killer capable of instantly frying tiny circuit chips.
· Eye and Skin Protection: Shards of shattered glass are extremely sharp. Wear safety goggles, and apply a layer of clear adhesive tape over the cracked screen to prevent glass fragments from flying out or cutting your fingers during the repair process.
II. Detailed Disassembly and Repair Steps
Step 1: Data Backup and Power Off
Before disassembling the device, be sure to back up your data. Additionally, you must power off the phone completely. This is the cardinal rule for all electronics repair.

Step 2: Heating and Opening (The Most Difficult Part)
Use a hot air gun to evenly heat the edges of the screen (to approximately 60–80°C) until it feels hot to the touch but is still bearable. Use a suction cup to lift the screen just enough to create a tiny gap, then quickly insert a plastic opening pick.
· Expert Tip: Slide the pick slowly; if you encounter resistance, apply heat again. Never force the prying motion, as extremely fragile flexible cables (flex cables) are distributed along the perimeter of the screen.
Step 3: Disconnect the Battery First!
This is a critical mistake that beginners most frequently overlook. Once the screen assembly is opened, the very first step is to remove the battery connector cover and disconnect the battery flex cable. Working on the device while it is still powered on carries a high risk of short-circuiting the motherboard or burning out the backlight IC.
Step 4: Transferring Core Components
If you have purchased a replacement screen assembly that does not come with pre-installed small parts, you will need to transfer the earpiece, sensor module, and even the Face ID/fingerprint recognition components from your original screen to the new one.
· Technique: Use 90% isopropyl alcohol to soften the adhesive backing these components, then gently pry them loose.
Step 5: Cleaning and Resealing
Before installing the new screen, you must thoroughly remove any residual adhesive from the device's frame. Leftover adhesive can prevent the new screen from seating flush against the frame, thereby compromising the device's water resistance.
· Applying Adhesive: Use a pre-cut, device-specific adhesive strip; align it carefully with the frame and press it into place.
III. Pitfall Guide: The Hidden Costs No One Tells You About
1. The Loss of Warranty and Water Resistance
The moment you open the back cover of the device, your official manufacturer's warranty is immediately voided. Furthermore, the device's original IP68 water-resistance rating relies on high-pressure factory sealing processes; even with the use of sealing adhesives during a DIY repair, it is extremely difficult to restore the device to its original, factory-grade level of water resistance.

2. Navigating the "Deep Waters" of Screen Quality
Replacement screens on the market generally fall into three tiers:
· OEM (Original Equipment Manufacturer): Offers perfect color reproduction, brightness, and touch sensitivity, but comes with the highest price tag ($80–$150).
· Refurbished Parts: Original LCD screens with replaced cover glass; these offer excellent value for money.
· Third-Party Compatible Screens: Inexpensive (typically $20–$40), but often suffer from issues such as a blue color tint, touch latency, or rapid battery drain.
3. The "Test Before Sealing" Rule
Before applying adhesive to seal the phone shut, temporarily connect the ribbon cables and power on the device. Perform the following tests: Check for full-screen touch sensitivity, look for any "dead spots" (unresponsive areas), and verify that the ambient light sensor is functioning correctly.
· Remember: Once the adhesive cures, the risk of damaging the device during a subsequent disassembly attempt doubles.
4. Battery Safety
The lithium-ion battery inside the phone is encased within a flexible aluminum-plastic pouch. It is strictly forbidden to use metal tweezers or sharp objects to pry at the battery. If the battery is punctured, it will trigger a violent chemical reaction, potentially resulting in smoke, fire, or even an explosion.
· Emergency Protocol: In the event of a battery fire, *never* attempt to extinguish it with water. Instead, quickly move the device to a well-ventilated outdoor area, allow the battery to burn itself out naturally, and keep a dry chemical fire extinguisher close at hand.
IV. Prevention Is Better Than Repair
While DIY repairs can provide a sense of accomplishment, they come with a hidden risk: a 55% failure rate and a significant time investment—often amounting to several hours.
1. Cost Comparison: Repair vs. Protection
| Factor | DIY Repair | Pro Repair | Prevention |
| Investment | $50 - $100 | $150 - $300 | $60 - $90 (One-time) |
| Time Needed | 3-4 Hours | 1-2 Hours | 1 Minute (Installation) |
| Risk Level | Extremely High | Very Low | None |
| Resale Value | Decreased | Maintained | Preserved |
2. Why Do You Need "Phonefix-Grade" Protection?
Most screen damage occurs the moment a phone is dropped. Standard, slimline phone cases typically only prevent scratches; they are incapable of absorbing the force of an impact. A truly protective solution—such as a Phonefix Phone case—utilizes a combination of a rigid polycarbonate shell and shock-absorbing TPU zones. Coupled with a raised bezel design that sits 2mm above the screen surface, this construction effectively disperses impact energy, thereby fundamentally breaking the vicious cycle of repeated repairs.
For those attempting to repair a phone screen for the first time, the keys to success are preparation, patience, and meticulous care. During the repair process, you will need not only a certain level of technical proficiency but also the patience to attend to every minute detail. Be sure to use professional toolkits for phone repair, follow the repair steps precisely, and test every function to ensure the quality and integrity of the repair.


