For iPhone users, a shattered back glass panel often comes with a hefty repair bill. Since the iPhone 8 series—which adopted glass back panels to enable wireless charging—this design choice, while aesthetically pleasing, has made devices highly susceptible to damage. Phonefix is here to break down the costs associated with back glass repair, analyze the pros and cons of various repair channels, and provide detailed repair steps and professional tool usage guides to help you make the best possible choice.
I. iPhone Back Glass Repair Cost Breakdown
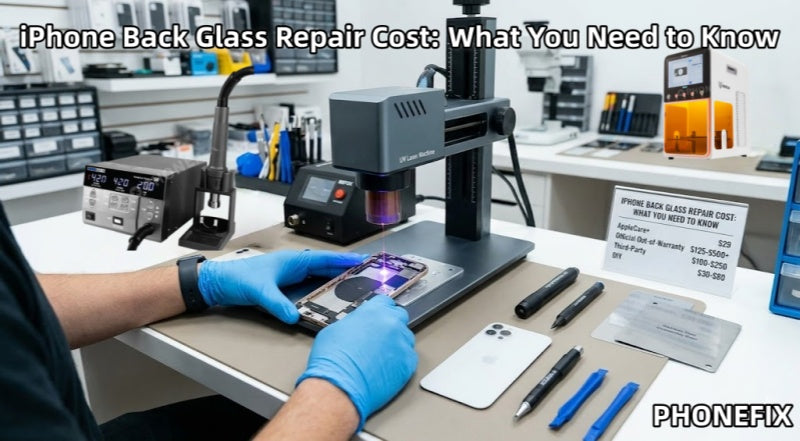
Repair costs primarily depend on your warranty status, your specific iPhone model, and the repair method you choose.
1. AppleCare+ Coverage
If you have purchased an AppleCare+ service plan, this is undoubtedly the most hassle-free option.
· Flat Rate: Whether you own an iPhone 12 or the latest iPhone 15 Pro Max, the deductible for replacing the back glass is a mere $29.
· Advantages: Genuine Apple parts, certified technicians, and preservation of water-resistance capabilities.

2. Official Apple Out-of-Warranty Repair
For users who did not purchase AppleCare+, the cost of official Apple repairs varies depending on the specific iPhone model. Generally, repair fees fall into the following categories:
· iPhone 15 Series: Approximately between $125 and $175; the exact cost depends on the specific model.
· Standard Models: Typically range from $159 to $300.
· Pro/Max Models: For the latest high-end models (such as the iPhone 14 Pro Max or iPhone 15 Pro Max), repair costs can exceed $500—potentially even approaching $799.
Note: It is worth noting that Apple's official repair service typically involves replacing the entire iPhone back glass housing assembly, rather than just the glass panel itself. This approach prioritizes repair quality, ensuring that the repaired iPhone maintains a higher level of stability and structural integrity.
3. Third-Party Repair Shops
This represents a middle-ground option for most users, with prices typically ranging from $100 to $250.
· Laser Repair Technology: Many professional third-party shops utilize laser disassembly machines, which can significantly reduce labor costs.
4. DIY Self-Repair
· Cost: Repair kits typically range from $30 to $80. · Risk: Extremely High. Improper handling can result in the destruction of the wireless charging coil, battery fire, or the loss of water resistance.
II. Why Do Repair Prices Vary So Widely?
1. Differences in Internal Structure: In "Pro" models released prior to the iPhone 14 series, the back glass is bonded to the mid-frame using an extremely strong adhesive. Official repair services typically opt for a complete "replacement-over-repair" approach—swapping out the entire back housing assembly (including buttons and charging coils)—which accounts for the high cost.
2. Introduction of Laser Technology: Third-party repair shops now utilize lasers of specific wavelengths to burn away the colored coating and adhesive situated beneath the glass. This process allows the shattered glass to be peeled away easily without the need to disassemble the device's delicate internal components, thereby significantly reducing repair costs.
3. Safety Hazards: The shards of shattered glass are extremely sharp; if they puncture the internal lithium-ion battery, a fire could ensue. Furthermore, the back glass sits in close proximity to the wireless charging coil and NFC antenna; forceful or careless removal can very easily result in the loss of these functionalities.
III. Repair Process and Required Tools
Regardless of the chosen repair method, replacing the back glass on an iPhone requires specific tools and technical proficiency. The following section details the tools and steps commonly employed during this repair process.
1. Essential Tools
· UV Laser Machine (e.g., REFOX RK10 or TBK): Used for the automated, "cold laser" removal of adhesive.
· High-Power Hot Air Gun (e.g., Sugon 8620DX): Used to assist manual removal; temperature should be controlled between 250°C and 300°C.
· Glass Breaker Pen: Utilizes spring-loaded impact force to shatter and loosen larger fragments of residual glass.
· Stainless Steel Disassembly Sheets and Ultra-Thin Pry Tools (e.g., QianLi "Cool"): Used to peel away glass fragments.
· B-8000 Adhesive or Specialized Back Cover Bonding Glue: Used for the final re-bonding of the back cover.
· Anti-Static Tweezers and a Fine-Bristled Brush.

2. Repair Steps
Step 1: Preparation
· Power Off the Device: To ensure operational safety, you must power off the iPhone completely before commencing any repair work.
Step 2: Laser Marking and Scanning
· First, place the iPhone securely onto the designated positioning fixture. · The laser machine features built-in schematics for various iPhone models, allowing it to precisely bypass the camera module, wireless charging coil, and flash assembly.
· The laser beam is emitted, rapidly carbonizing the black or colored adhesive layer situated beneath the glass back panel.
Step 3: Cracking and Initial Separation
· For areas where the glass is not severely shattered, use a glass-breaking pen to gently tap along the edges of the glass panel.
· The instantaneous impact force generated by the breaking pen will fracture larger glass shards into smaller, more manageable particles that are easier to remove.
Note: Strictly avoid applying excessive force when tapping near the camera module or the battery location.
Step 4: Heat Application and Prying
· Use a hot air rework station to apply heat evenly across the surface of the glass.
· Hold the hot air rework station in one hand and a prying tool (spudger) in the other.
· Begin working from the area with the most severe glass damage, using the angled tip of the prying tool to slowly peel away the glass fragments.
Repair Detail: When peeling away the glass over the wireless charging coil (located in the center of the phone), the prying tool must be kept strictly horizontal; strictly avoid inserting the tool too deeply, as this risks severing the coil.
Step 5: Adhesive Removal and Mid-frame Reshaping
· Use an adhesive remover solution (such as 530 Cleaner) in conjunction with a fine-bristled brush to thoroughly remove any residual adhesive from the edges of the mid-frame.
· If the mid-frame is deformed, it must be reshaped using a specialized straightening tool; otherwise, gaps or light leakage may occur after the new glass is installed.
Tip: This step is critical in determining the overall quality of the repair.
Step 6: Test Fitting and Bonding
· Before applying any adhesive, place the new back glass cover onto the device to check for uniform alignment and to ensure there are no uneven gaps.
· Once alignment is confirmed, apply a specialized waterproof cold-bonding adhesive evenly along the edges of the mid-frame.
Step 7: Pressurization and Curing
· Use specialized clamping fixtures to apply uniform pressure to both the front and back of the phone, maintaining this pressure for at least 30 minutes.
Tip: This step ensures a seamless, tight bond between the glass and the mid-frame, thereby restoring a degree of the device's original water resistance.

3. Safety Precautions
When performing an iPhone back glass repair, it is imperative to pay close attention to the following safety considerations:
· Battery Risk: Accidental damage to the battery during the repair process can lead to safety hazards such as short circuits or fires. Handle the battery with extreme care at all times.
· Wireless Charging Issues: Damage to the iPhone's back glass may interfere with its wireless charging capabilities; therefore, when replacing the back cover, ensure that the new cover does not obstruct or compromise the iPhone wireless charging coil.
· Professional Repair is More Reliable: While DIY repairs may appear to be a cost-effective option, unprofessional handling can cause irreversible damage to the device—particularly with high-end models. Users who have the means are advised to opt for authorized, professional repair channels.
IV. Choosing the Right Repair Method
When it comes to repairing a damaged iPhone back glass, selecting the appropriate repair method is crucial. Here are some recommendations to help you make the best choice:
1. If you have purchased AppleCare+, utilizing Apple's official repair service is the most economical and secure option, offering guaranteed repair quality.
2. If you do not have AppleCare+ and the repair costs are substantial, consider choosing a reputable third-party repair shop; their pricing is typically more affordable.
3. If you possess some prior repair experience and are willing to accept the associated risks, you may opt for a DIY repair kit. However, be sure to follow the instructions precisely and back up your data before attempting any repairs.
Damage to the iPhone's back glass is a common issue, and repair costs vary depending on factors such as the specific iPhone model, the chosen repair method, and whether or not you have AppleCare+ coverage. Regardless of whether you choose Apple's official service or a third-party provider, it is essential to understand the respective costs, benefits, and potential risks involved. For DIY enthusiasts, while self-repair can save money, ensure that you possess the necessary professional toolkits for mobile phone repair to avoid causing further damage to your device. Ultimately, choosing the right repair method will enable you to restore your iPhone's appearance and functionality at the most reasonable cost.


