In today's mobile phone repair landscape, the application of laser technology represents a revolutionary advancement—particularly when dealing with the back glass, screen bezels, and other precision components of iPhone and Android devices. Laser machines—specifically fiber lasers—enable high-precision, automated repair processes, thereby significantly boosting repair efficiency, reducing turnaround times, and ensuring superior repair quality. Phonefix presents this detailed guide on the use of laser machines in mobile phone repair, covering their key applications, operating principles, step-by-step repair procedures, and essential safety precautions.
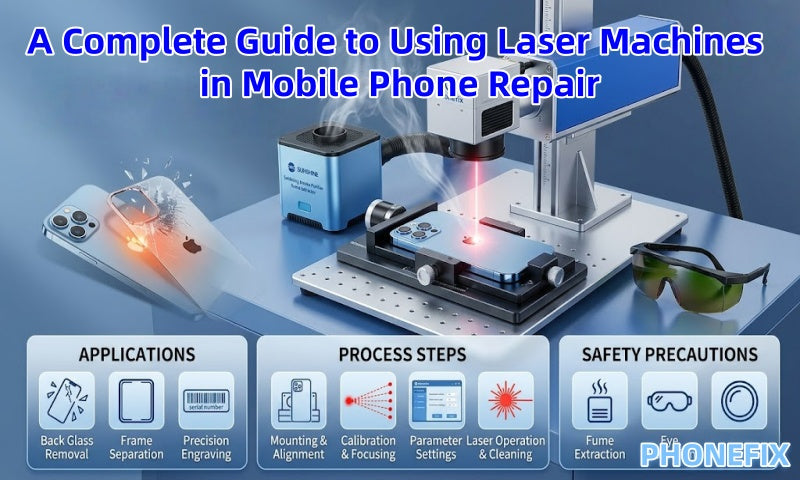
I. Key Applications of Laser Equipment in the Repair Sector
The widespread adoption of laser machines in repair shops is primarily attributed to their non-contact, high-energy physical properties. By utilizing a high-power-density beam, these machines can instantly vaporize adhesives or coatings without inducing mechanical stress.
1. Efficient Back Glass Removal:
This constitutes the core application of laser machines in current repair practices. Previously, replacing the back glass on iPhone 8 models and subsequent generations required prolonged heating on a YCS CP01 Heating Pad followed by forceful physical removal—a process that not only carried the risk of scratching the device frame but also typically consumed over two hours. By utilizing a laser to ablate the adhesive, the entire procedure can now be completed in just 10 to 20 minutes.

2. Separation of Brackets and Bezels:
For devices featuring curved screens or specific LCD/OLED assemblies, lasers can precisely target bracket contact points and rapidly vaporize excess adhesive trapped between the frame and the display assembly, thereby enabling a damage-free separation.
3. Precision Etching and Customization:
Laser machines boast exceptional positioning accuracy, allowing for the engraving of serial numbers and brand logos onto metal or glass surfaces. Furthermore, they enable repair shops to offer personalized customization services, etching unique patterns or designs for customers.
4. Internal Residue Cleanup:
Once the old glass has been removed, the laser can perform a secondary cleaning pass to eliminate stubborn adhesive clumps and residual black paint from the frame's recessed grooves, ensuring a perfectly smooth and level surface for the subsequent installation of the new back glass.
II. Types of Lasers Commonly Used in Repair and Their Characteristics
Since different materials exhibit varying absorption rates for light waves, mobile phone repair operations primarily utilize the following three categories of lasers:
1. Fiber Lasers:
The industry-standard choice for mobile device repair. Its wavelength is highly absorbable by metals and adhesives, and it possesses strong penetration capabilities, making it the optimal tool for removing adhesive from iPhone back covers and for metal etching. Examples of devices in this category include the Forward Blue Light Laser Machine and the YCS DPCA Mini.
2. UV Laser:
Characterized by an extremely short wavelength and a minimal heat-affected zone (HAZ), this technology is often referred to as "cold processing." It is primarily utilized for precise screen separation or for removing adhesive surrounding heat-sensitive components—such as with the REFOX RK10.
3. CO2 Laser:
Primarily designed for cutting and marking non-metallic materials (such as leather, wood, and certain plastics), this type of laser sees limited application in fundamental mobile phone structural repairs; instead, it is more commonly used for customizing device casings and accessories.
III. Core Practical Steps: Taking iPhone Back Glass Replacement as an Example
Using a laser machine to replace back glass is not merely a simple "align-and-cut" operation; rather, it is a systematic process that integrates hardware disassembly, software calibration, and physical cleaning.
Step 1: Preliminary Preparation
Before initiating the laser disassembly operation, it is essential to first remove key components from the phone—such as the screen, battery, camera modules, and motherboard. This step is critically important, as these precision electronic components are highly susceptible to damage from high temperatures or laser radiation, which could result in irreparable harm. During the disassembly process, professional tools—such as MECHANIC FLY Screwdriver Set, suction cups, and spudgers—must be utilized to ensure the procedure is performed safely and without causing damage to other parts of the device.
Step 2: Mounting the Phone Frame
· Use Specialized Fixtures: Place the phone frame onto the laser machine's work platform. It is recommended to use an auto-centering fixture or an aluminum alloy mold specifically customized for the device model. This ensures the phone remains level throughout the laser scanning process, preventing displacement that could cause the laser beam to drift onto the device's metal frame, thereby causing cosmetic damage.

Step 3: Laser Calibration and Focusing
The power of the laser is determined by the size of its "focal spot." Maximum energy concentration is achieved only when the beam is precisely positioned at the focal point.
· Manual/Auto-Focusing: Activate the machine's red-light positioning function. Typically, two red light dots will appear. By adjusting the lifting platform, when these two red dots converge into a single point, it indicates that the distance between the laser head and the phone's back panel has reached the preset focal length.
· Horizontal Calibration: Verify that the heights of the phone's four corners are consistent to ensure that the entire laser scanning process remains within the effective focal range.
Step 4: Select Software and Configure Parameters
The laser machine is driven by CAD software.
· Model Selection: Search for the corresponding phone model (e.g., iPhone 15 Pro Max) within the accompanying software. The software will automatically load the "adhesive layout diagram" specific to that model.
· Layout Fine-tuning: Before initiating the actual scan, disable the laser output and activate only the red light preview function. Observe whether the red light path successfully avoids the wireless charging coil, frame edges, and flash cutout. If any deviation is detected, manually fine-tune the X/Y axis coordinates within the software.
Step 5: Laser Operation
· First Pass (Whitening): Activate the laser. The laser beam will pass through the glass to strike the underlying paint and adhesive layers, causing them to vaporize. During this process, noticeable smoke and a distinct odor will be generated.
· Status Monitoring: Ensure that the laser path remains uniform. The REFOX RK10 UV Laser Machine is capable of precisely avoiding metal shielding plates, targeting and burning away only the adhesive located beneath the damaged glass.
Step 6: Cleaning and Inspection
· Glass Removal: Once the laser operation is complete, the adhesive will have lost its bonding strength. Use a professional stainless steel spudger or a glass-breaking pen to gently press along the fractured edges. The glass should now peel off in large fragments.
· Fine Adhesive Removal: Utilize the laser machine's "secondary marking" function to clean away any stubborn black adhesive residue remaining on the edges of the bezel and mid-frame. For corner areas, use a pair of adhesive-removal tweezers in conjunction with an anti-static brush to complete the cleaning process.
· Surface Cleaning: Wipe down the metal mid-frame using an adhesive remover or 99% isopropyl alcohol to ensure the surface is free of grease and dust, thereby preparing it for the installation of the new glass back.

IV. Safety Precautions
The laser machine is a high-precision device that poses certain inherent risks; therefore, the following safety protocols must be strictly observed during operation:
1. Hazardous Fume Management: The ablation of adhesives and plastics generates dense smoke containing toxic substances such as formaldehyde and cyanide. 1. Operation Safety: Operating the device without a smoke purifier is strictly prohibited. The SUNSHINE Soldering Fume Extractor must be connected to ensure a safe working environment.
2. Eye Protection: Fiber lasers emit invisible infrared light; direct or reflected exposure to the eyes can result in permanent blindness. Operators must wear laser safety goggles rated for the corresponding wavelength (typically 1064nm) and must never look directly into the laser processing area.
3. Equipment Maintenance:
· Field Lens Cleaning: Regularly inspect the field lens located beneath the laser head. If dust or smoke particles accumulate on the lens, the heat generated as the laser passes through can cause the lens to crack and result in a significant drop in laser power. Clean the lens using specialized lens paper and anhydrous ethanol.
· Guide Rail Lubrication: Ensure that the X/Y-axis guide rails move smoothly to prevent scanning pattern distortions caused by mechanical jamming.
The application of laser technology in mobile phone repair has gradually become an industry standard. Laser equipment demonstrates unparalleled advantages, particularly in tasks such as removing back cover glass, detaching screen bezels, and performing precision engraving. By utilizing professional mobile repair toolkits and efficient workflows, laser equipment not only significantly boosts repair efficiency but also ensures the quality of repairs and the safety of the devices being serviced. In the future, as technology continues to advance, laser equipment is poised to play an even more pivotal role in the field of mobile phone repair.


