Replacing an iPhone screen is a delicate job. Many DIYers install the new screen, see it light up, and assume everything is fine. Then they find dead pixels, unresponsive touch areas, or color issues — and have to tear the phone apart again. Professional repair technicians follow one iron rule: test the screen before you install it. This guide covers three testing methods — app-based testing, Apple's official diagnostics, and hardware testers — so anyone can verify a replacement screen works properly before committing to full installation.

I. Why Testing Before Installation Matters
· A new screen might look flawless at first glance, but problems often hide beneath the surface. Dead pixels, touch dead zones, multi-touch failures, and color inaccuracies don't always show up during a quick boot test. Once the screen is fully mounted with adhesive and screws, removing it becomes a risky operation — bent flex cables, damaged connectors, or broken motherboards can result.
· Dedicated testing tools allow repairers to power on and test a replacement screen before it ever touches the phone's motherboard. These tools catch defects early, saving both time and hardware. For screens that pass the hardware check, a Phone Programmer can further restore True Tone functionality by transferring the original screen's calibration data to the new panel.
· The correct workflow is simple: receive the screen, test it with minimal connection, confirm all functions work, then install it properly. This approach saves hours of rework and prevents expensive mistakes. Three testing methods exist, each suited to different users and budgets.
II. Test screens with apps, diagnostics, or hardware
1. Method One: App-Based Testing
For individual users, app-based testing is the easiest and most cost-effective option. Several professional-grade diagnostic apps are available on the App Store.
· Dead Pixel Test: Screen Check runs nine display diagnostics on the device — dead pixel detection, touch response, color accuracy, burn-in detection, screen uniformity, and more. All tests run locally on the device, and no data leaves the phone. The app automatically detects whether the screen is OLED or LCD and shows only relevant tests. Results appear as clear pass, fail, or warning verdicts — not ambiguous data. Users can generate shareable PDF reports for documentation.
· ScreenTest offers ten professional tests including dead pixel detection, touch screen testing, multi-touch verification, color accuracy, uniformity, contrast, grid patterns, response time, brightness, and burn-in detection. The app is under 500KB, contains no ads or tracking, and works completely offline.
· ScreenDoctor PRO provides comprehensive diagnostics including solid color tests (white, black, red, green, blue), gradient testing for color banding, burn-in detection, grid alignment verification, touch drawing tests, multi-touch testing, and response latency measurement.
· For a quick check without downloading anything, iOS offers built-in options. Set the wallpaper to solid colors (black, white, red, green, blue) and examine the screen for stuck or dead pixels. Open Notes and draw lines with a finger — fast strokes, slow strokes, diagonal lines — to check for touch dead zones.
· Important limitation: App-based testing requires the phone's existing screen to be functional enough to run the apps. If the old screen is completely dead or cracked beyond use, this method won't work.
2. Method Two: Apple Diagnostics
Apple has made its professional diagnostic tool available to regular users through the Self Service Repair program. This is not a third-party utility — it's Apple's own system-level test suite, capable of scanning display pixels, multi-touch sensitivity, Face ID, camera modules, and audio systems.
Two ways to run Apple Diagnostics:
· Apple Diagnostics for Repair runs directly on the device being tested. The iPhone uses its built-in display as the diagnostic console. Requirements: iPhone 12 or later, iOS 18 or later, and a Wi-Fi connection (cellular is not supported).
· Apple Diagnostics for Self Service Repair uses a secondary device as the diagnostic console. Users enter the serial number of the device being serviced on a separate device with a web browser, select the recommended test suite, and results appear on the secondary device. This method works even if the device's display is unusable.
How to enter diagnostics mode:
1. Turn off the iPhone.
2. Press and hold both the volume up and volume down buttons.
3. While holding the buttons, plug the iPhone into a power adapter (18W or higher recommended) or a powered computer.
4. Release the buttons when the Apple logo appears.
5. When the "Diagnostics" screen appears, tap "Start Session".
The diagnostic suite can detect pixel anomalies (dead spots, bright spots, color shifts), multi-touch sensitivity and dead zones, Face ID functionality, camera image quality, and audio system performance.

3. Method Three: Hardware Screen Testers
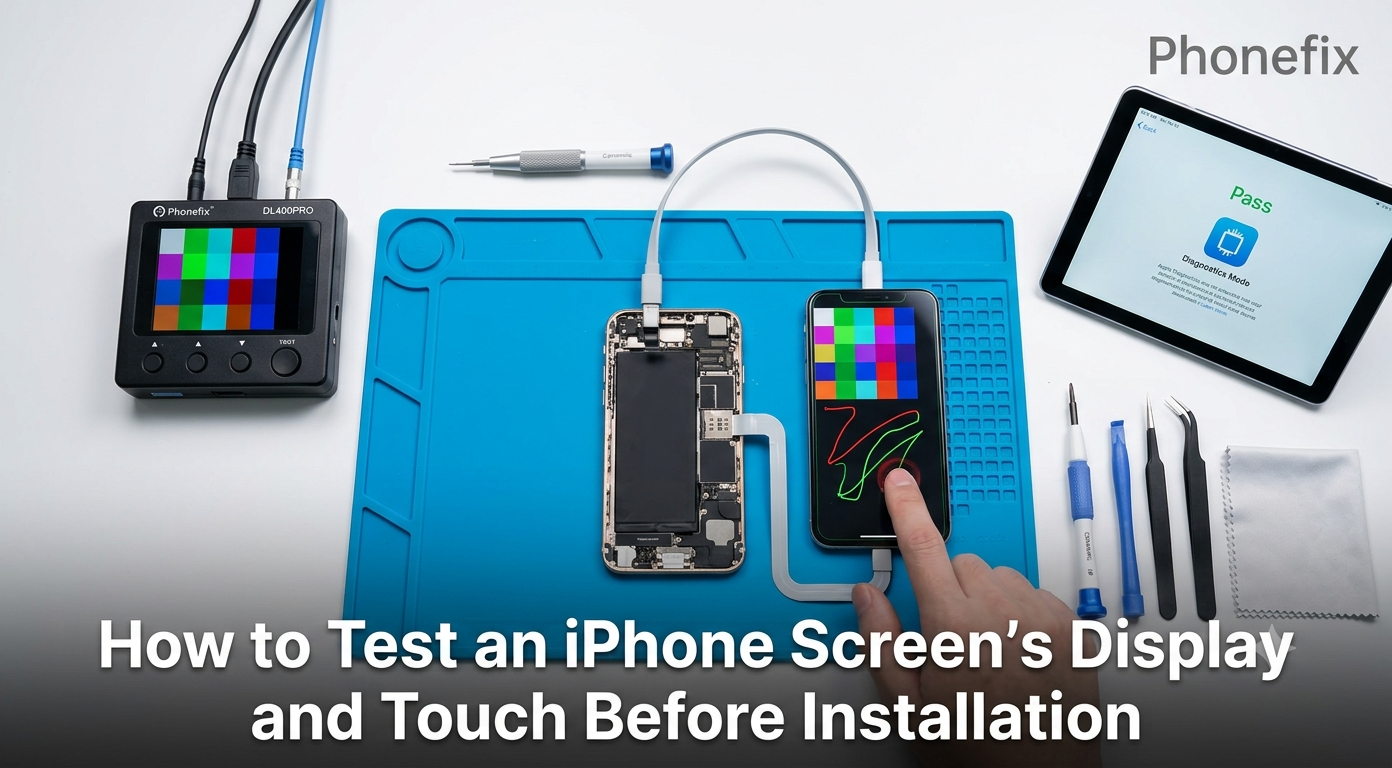
For repair shops or users who replace screens regularly, hardware testers offer the fastest and most reliable testing. These devices can test a screen without connecting it to the iPhone's motherboard — eliminating the risk of damaging the phone during testing.
· DL400PRO Phone Screen Tester is a budget-friendly option that supports iPhone 6 through 17 Pro Max. The device uses EDP (Embedded DisplayPort) boards and custom flex cables to replicate the motherboard's timing signals. It cycles through five solid colors — red, green, blue, white, black — to verify basic display function. Professional tests show the DL400PRO achieves a 98.3% success rate in powering on screens on iPhone 14 Pro and 15 Pro models, compared to just 42% with cheaper alternatives.
· YCX M830 is a more advanced multi-function tester supporting iPhone 6 through 16 series, as well as Samsung, Huawei, Xiaomi, and other Android brands. Features include display testing with manual and automatic test patterns, touch testing with multi-finger drawing, 3D Touch verification, and original color repair.
· Testing flex cables are another simple option. These external cables allow LCD testing without repeatedly plugging and unplugging from the phone's motherboard, reducing wear on FPC sockets and preventing expensive motherboard damage.
III. The Programmer: Solving the True Tone Problem
· After replacing a non-original screen, iPhone users often lose the True Tone function. A screen programmer solves this issue by transferring serial number data from the old screen to the replacement.
· The JC V1SE reads original manufacturing data (screen code, battery code, fingerprint serial number) directly from the phone and performs one-key True Tone repair. It supports iPhone 6 through 15 Pro Max and can also transfer data for batteries, haptic engines, and home buttons. Since iOS 18, Apple's Repair Assistant tool can restore True Tone with original Apple screens through system pairing, but for third-party screens, a programmer remains essential.
IV. The Complete Pre-Installation Testing Workflow
Step 1: Visual inspection. Examine the new screen for physical damage — cracked glass, bent flex cables, or missing components.
Step 2: Hardware test. Connect the screen to a DL400PRO or YCX M830 tester. Verify the screen lights up, displays solid colors correctly, and registers touch inputs across the entire surface.
Step 3: Light connection test. Gently connect the screen's flex cables to the iPhone motherboard (do not install screws or brackets yet). Power on the phone and run app-based tests or Apple Diagnostics to verify display quality, touch response, multi-touch, and color accuracy.
Step 4: True Tone verification. Check Settings → Display & Brightness for the True Tone option. If missing, use a programmer like JC V1SE to restore the function.
Step 5: Full installation. Only after all tests pass should the screen be fully mounted with screws, brackets, and adhesive. After installation, run a quick final test to ensure nothing was disturbed during assembly.

Testing an iPhone screen before installation takes ten minutes. Skipping that test can cost hours of rework — or worse, a damaged motherboard. For occasional DIYers, free apps and Apple Diagnostics provide adequate testing. For repair professionals, hardware testers and programmers are essential investments that pay for themselves quickly. The right mobile phone Screen Repair Tools make the difference between a smooth repair and a costly mistake. Test first, install second — that rule never fails.