Screen refurbishment is one of the most common smartphone repair projects, and the quality of its core equipment, the Screen Laminating Machine, directly determines the success of the repair outcome. PHONEFIX will explore in depth the core applications of vacuum laminating machines in modern smartphone screens, the technical classification of different models, and break down the standardized operational workflow from preparation to actual lamination by combining specific fault cases.

I. The Application of Screen Laminating Machines
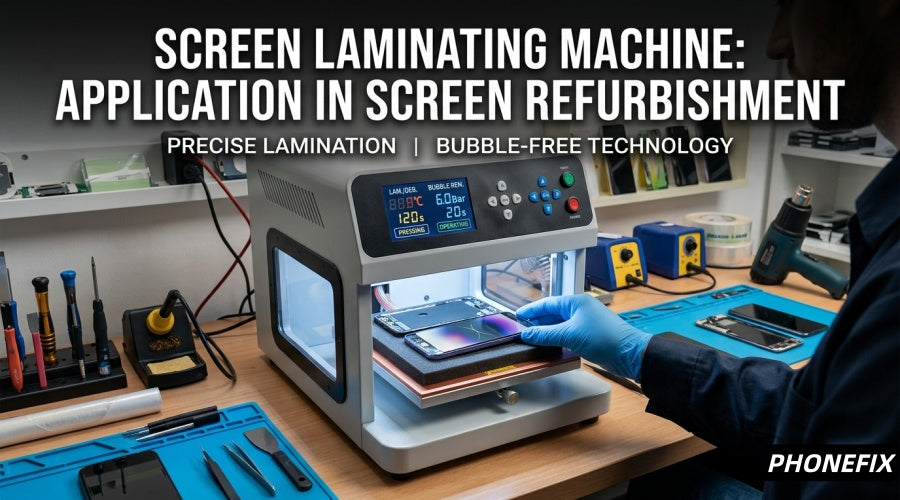
Throughout the cell phone refurbishment process, the laminating machine performs three critical functions:
1. Precision OCA Lamination
OCA dry adhesive is a substrate-free, cross-laminated optical double-sided tape with a light transmittance exceeding 99%. Before the lamination process begins, the high-purity OCA dry adhesive must be accurately and smoothly applied to the surface of a brand-new glass cover or a cleaned internal display screen. The Screen Laminating Machine provides uniform initial pressure to prevent the adhesive layer from wrinkling or trapping large areas of air at the moment of application.
2. Precision Screen Alignment
This is the most critical step in screen refurbishment. Any tiny bubble or alignment deviation will result in a scrapped screen. When the laminating machine operates, it first extracts all air within the chamber to create a negative pressure vacuum environment (usually requiring a vacuum level of -95kPa to -100kPa). Subsequently, the equipment applies downward pressure via a built-in precision cylinder or a highly flexible airbag, bringing the aligned glass cover and internal display into molecular-level contact under vacuum. Since there is no air inside the chamber, the generation of large, explosive air bubbles is fundamentally eliminated.
3. High-Pressure Physical Bubble Removal
Although lamination is completed under a vacuum environment, microscopic, invisible residual bubbles may still remain at the outer edges of the glass, the borders of the OCA adhesive, or areas with slight flatness variations on the internal screen surface. The laminating machine (or a standalone bubble remover) utilizes a high-pressure chamber filled with 5 to 7 atmospheres (0.5-0.7MPa) of compressed air, combined with temperature-controlled heating between 40°C and 50°C. Through high pressure, the tiny bubbles are laterally squeezed, dissolved, and diffused into the molecular gaps of the OCA adhesive, thereby achieving complete bubble elimination and 100% mirror-like light transmittance.

II. Classification and Technical Characteristics of Laminating Machines
1. Screen Laminating and Bubble Removing Machine
· Structural Characteristics: This type of equipment highly integrates the vacuum pump, compressor, laminating chamber, and bubble-removing chamber within a single chassis. It usually adopts a PLC microcomputer control system operated via a touchscreen.
· Applicable Scenarios: Due to its small footprint, it is suitable for small-to-medium-sized phone repair shops or quick-repair stores utilizing a front-shop, back-factory model. Its laminating area is generally between 7 and 10 inches, primarily used for the daily refurbishment of flat screens such as iPhones and iPad mini displays.
2. Curved Screen Specialized Mold Laminating Machine
· Structural Characteristics: For curved flexible OLED screens like the Samsung Galaxy series and Huawei Mate/P series, traditional flat airbag pressing can easily lead to crushed edges or incomplete lamination. A curved laminating machine must be paired with high-precision metal alignment molds (typically divided into an upper mold, lower mold, and middle frame rubber mold), utilizing a curved conformal silicone pad to ensure the lamination pressure surface perfectly conforms to the screen curvature under vacuum.
III. Analysis of a Typical Fault Case
To demonstrate the collaborative workflow of the vacuum laminating machine and related repair tools more intuitively, we take the typical fault of "an iPhone 13 original factory OLED screen with shattered outer glass but a normal internal screen requiring a glass cover replacement" as an example to conduct a full-process technical analysis.
1. Fault Manifestation and In-Depth Diagnosis
· Fault Phenomenon: The iPhone Front Glass surface of the phone has distinct spiderweb-like cracks. However, when observed under strong light, the underlying OLED display shows no black spots, no liquid leakage, and no horizontal or vertical bright lines. Furthermore, during full-screen icon dragging tests, the touch response is sensitive with no dead zones or disconnected touch points.
· Fault Analysis: This is a classic case of "shattered outer screen, intact internal screen." Since the iPhone 13 uses a flexible OLED panel, its outer layer is tightly bonded to the ceramic shield glass via OCA optical adhesive. The repair objective is to separate the shattered glass, clear the residual adhesive, and use a vacuum laminating machine to press-laminate a brand-new glass cover without damaging the fragile OLED panel.

2. PreRepair Preparation
Before commencing the operation, the following high-specification professional auxiliary tools and original-grade materials must be prepared:
· Heating Separation Platform: A constant-temperature heating platform with a built-in vacuum suction function, used to soften the OCA adhesive.
· Cutting Wire: High-toughness tungsten alloy steel wire with a diameter of 0.03mm - 0.04mm, used to separate the internal and external screens.
· Adhesive Remover: An eco-friendly, specialized liquid adhesive remover.
· Electric Glue Remover: A miniature, low-speed electric glue roller equipped with needles of varying hardness.
· Cleaning Tools: Anti-static dust-free cloth and dust-free wiping swabs.
· iPhone 13 high-transmittance glass cover with pre-applied OCA adhesive.
· iPhone 13 specialized alignment and positioning mold.
3. Detailed Standardized Repair Steps
Step1. Heating and Shattered Glass Separation
· Set the temperature of the Screen Heating Separator to between 85°C and 90°C and wait for the temperature to stabilize. Place the screen assembly removed from the phone face-up onto the silicone suction pad of the separation platform, and turn on the vacuum suction switch to secure the screen firmly to the platform surface.
· Heat for approximately 1 to 2 minutes until the outer screen OCA adhesive is fully warmed and softened. Hold both ends of the 0.03mm wire firmly and steadily with both hands. Cut in from an undamaged area at the top of the screen or an edge with fewer cracks, keep the wire tight against the upper surface of the internal screen, alternate pulling the wire left and right at a slight angle, and slide downward slowly to completely separate the shattered glass cover.
Step2. Efficient Cleaning and Adhesive Removal
· After cutting is complete, a large amount of webbed or clumpy solid OCA residual adhesive will remain on the surface of the OLED internal screen. Keep the internal screen on the separation platform to maintain slight heat. Start the electric glue remover, place the glue-rolling needle against the edge of the residual adhesive, and use low-speed rotation to roll up and remove the residual adhesive.
· Spray a small amount of adhesive remover onto a dust-free cloth and gently wipe away the trace adhesive marks remaining on the internal screen surface. Wiping must be done in a single direction; do not rub forcefully to prevent causing black spots on the flexible OLED substrate due to pressure. Finally, dip an anti-static dust-free cloth into an appropriate amount of high-purity anhydrous alcohol to perform the final thorough cleaning, until no fingerprints, dust, lint, or rainbow patterns are visible on the screen surface when inspected under a 45-degree strong spotlight.
Step3. Alignment and Entering the Vacuum Lamination Chamber
· Smoothly place the cleaned OLED internal screen, which has reached a dust-free cleanliness level, into the lower layer of the iPhone 13 specialized aluminum alloy alignment mold. Peel off the OCA optical adhesive protective film that comes with the new glass cover, and smoothly place the glass cover over the internal screen guided by the positioning pins of the mold.
· Gently press the exact center of the screen with a finger to create an initial bond between the OCA adhesive and the center of the internal screen, preventing physical misalignment during movement. Open the door of the vacuum laminating machine chamber, and place the aligned screen assembly and mold flat into the center of the lamination workstation.
Step4. Parameter Configuration and Automated Vacuum Lamination
· Adjust the core process parameters on the intelligent touch panel of the laminating machine. Set the lamination temperature and lamination pressure data specifically for the iPhone 13 flexible OLED screen. Press the start button with both hands; the chamber door will automatically close pneumatically and lock. Observe the vacuum gauge pointer as it moves rapidly into the negative pressure zone.
· Once the preset vacuum level is reached, the internal cylinder drives the press head downward smoothly, powerfully compounding the glass cover and the internal screen into a single unit under a high vacuum state. After the preset time elapses, the chamber automatically vents and decompresses, the door opens, and the screen is removed. At this stage, slight physical micro-bubbles are usually present around the edges of the screen.
Step5. High-Pressure Heated Bubble Removal
Place the laminated screen assembly into the chamber of a standalone bubble remover and activate the bubble removal switch. The compressor begins injecting high-pressure air into the chamber. Under the joint action of high pressure and mild heat, the tiny residual gases inside the OCA adhesive layer are forced to dissolve. When the bubble removal countdown ends, the equipment automatically exhausts the air. Open the chamber door and remove the screen; the surface of the iPhone 13 screen is now as flat as a mirror, free of any bubbles or impurities, perfectly restoring its original factory lamination quality.

IV. Technical Advantages and Industry Value
1. Cost Optimization
For repair institutions, directly replacing an original factory OLED screen assembly incurs extremely high material procurement costs. However, if only the outer glass is shattered, the combined material cost of a high-quality glass cover and OCA adhesive is only about one-tenth of the entire assembly cost. The vacuum lamination process enables repair technicians to earn a high premium for technical services while significantly reducing repair costs for consumers.
2. Original Factory Display and Touch
Aftermarket replacement screens often struggle to match original screen standards regarding color saturation, viewing angles, refresh rates, and power consumption control. For screens repaired via vacuum lamination technology, the core liquid crystal or OLED panel remains the one originally built into the phone. Therefore, it completely preserves the original factory color display, HDR high dynamic range, and original-quality touch responsiveness, preventing customer complaints associated with replacing screens with aftermarket alternatives.
3. Enhanced Delivery Efficiency
Relying on manual labor or simple fixtures to press screens makes it impossible to control pressure uniformity and ambient air, resulting in an extremely low yield rate. As an intelligent Cell Phone Repair Tool, the modern vacuum laminating machine relies on fully automated PLC program control to completely digitalize and standardize temperature, vacuum levels, lamination pressure, and time. As long as the preliminary cleaning and alignment work are executed properly, the equipment's lamination yield rate can stabilize above 99%, making it a highly reliable investment for professional repair personnel.


