Modern smartphones cram high-performance processing into ultra‑slim enclosures, turning hardware troubleshooting into a formidable task. A failing internal component typically produces a localized electrical short that generates concealed heat. This guide covers thermal camera heat‑signature capture, core benefits, real‑world fault scenarios, and a straightforward diagnostic workflow.

I. How Thermal Cameras See the Invisible
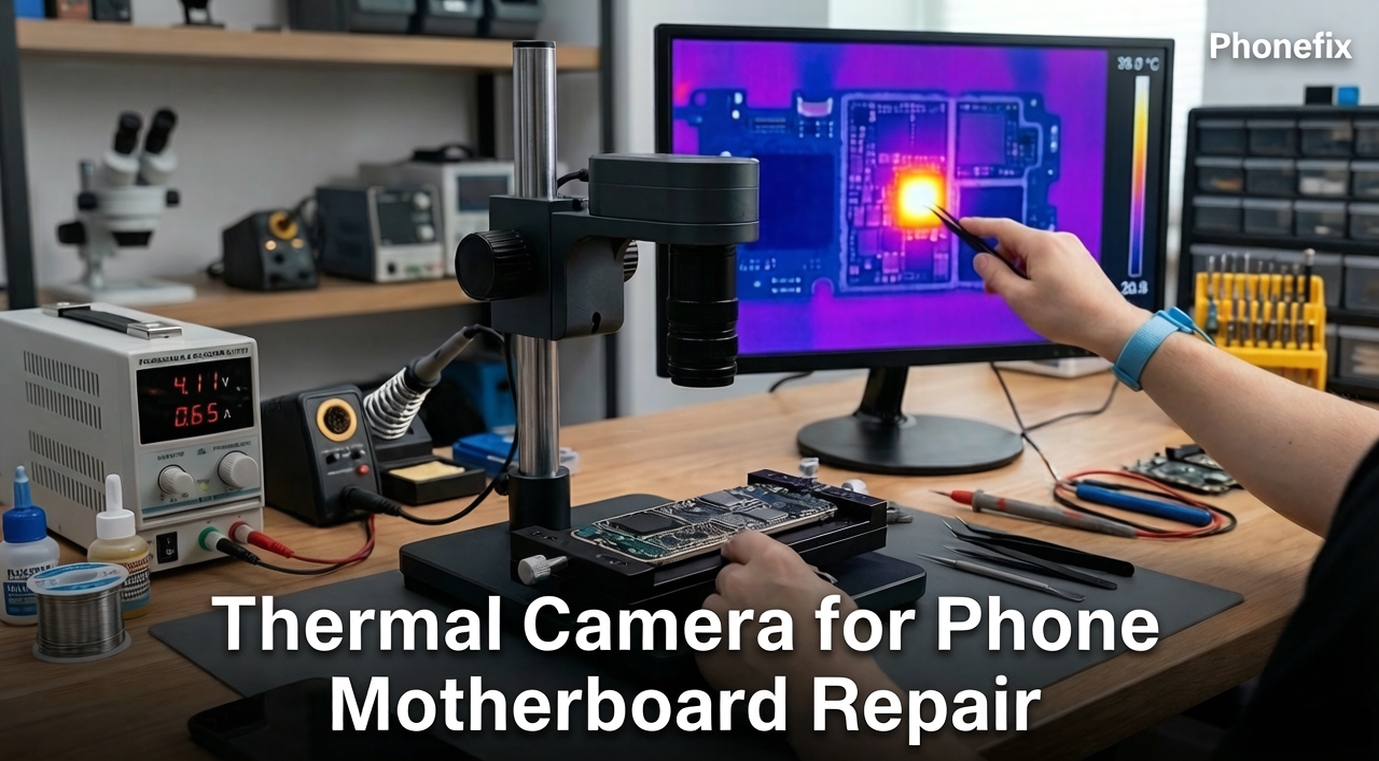
A Thermal Imaging Camera acts like a special set of eyes for a technician. Instead of capturing reflected light like a standard phone camera, it detects infrared radiation. Every object around us emits this invisible radiation based on how hot it is, even if it looks perfectly normal to the human eye.
The thermal camera uses a specialized lens and an infrared detector array to capture this invisible energy. The internal software then instantly processes this data into a live visual map on your computer screen. On this map, hotter objects show up as bright yellow, orange, or white, while cooler areas remain dark blue or purple. In phone repair, this gives you a direct visual window into exactly where electricity is turning into unwanted heat.
II. Core Advantages in the Repair Workshop
Bringing thermal imaging into the repair workflow offers several major benefits over old-school troubleshooting:
· Instant Short Circuit Identification: Short circuits cause immediate local heat accumulation. The camera catches this heat instantly, allowing technicians to pinpoint the exact broken part without hours of manual checking.
· Rapid Troubleshooting Speed: By providing real-time temperature data and instant visual feedback, the camera cuts down on tedious trial-and-error measurements, moving you from a dead phone to a solution in seconds.
· Safe, Non-Invasive Diagnostics: Traditional methods often involve spraying chemical freeze sprays or melting rosin smoke onto the board. Thermal cameras assess the health of the internal components without touching the board, leaving no residue and causing zero physical stress to delicate parts.
· Cross-Device Versatility: Many modern thermal cameras are highly adaptable. They can plug directly into Type-C Android devices or iOS setups, making them incredibly versatile assets for fixing tablets, laptops, and various smart gadgets beyond just phones.
Choosing Your Tool: Desktop Stations vs. Mobile Dongles
When investing in a thermal camera, you will generally choose between two main formats based on your workspace setup and budget:
· Professional Desktop Stations: These are bracket-mounted systems designed for brick-and-mortar repair shops. They offer the highest resolution, macro lenses for micro-soldering, and advanced software, though they come at a higher price point.
· Mobile Thermal Dongles: These are compact, budget-friendly accessories that plug directly into the bottom of a smartphone or tablet. They are perfect for hobbyists, independent technicians, or on-the-road mobile repair operations where portability is key.

III. Common Hardware Problems Exposed by Heat
You do not need to be an engineer to understand what a thermal camera reveals. When a phone motherboard is damaged, it typically fails in a few distinct, visual ways:
· The "Bright Flash" Main Short: This happens when a tiny protective component completely breaks down and acts like a shortcut for electricity, trapping the power and turning it into pure heat. The moment you apply power, a single tiny dot on the screen will glow white-hot.
· Overheating Control Chips: Sometimes, a major power distribution chip or charging chip becomes damaged internally. The camera will show the entire square chip warming up, signaling that it is either broken itself or working dangerously hard because of a hidden fault nearby.
· Slow Battery Drain: Some phones work perfectly but lose battery power rapidly overnight. This is often caused by a tiny electrical leak. The thermal camera catches these subtle faults by highlighting small parts that stay slightly warmer than the rest of the cold board.
How to distinguish normal heat from a fault: Normal components warm up gradually and evenly across a wide area during boot-up, whereas a faulty component flares up instantly into a sharp, localized, blinding white pinpoint the exact moment power is injected. Once the hot spot is identified, technicians typically use a multimeter to measure resistance to ground and confirm the short, then inspect the area under a Trinocular Stereo Microscope for visible cracks or burnt marks—these steps turn a thermal image into a concrete repair plan.
IV. Diagnostic Checklist
Follow this quick checklist to locate a motherboard fault under the camera:
1. Strip Down the Board
· Remove the motherboard completely from the phone frame.
· Take off all sticker shields and metal cages over the suspect area, or the camera cannot see the heat underneath.
2. Hook Up External Power
· Never use the phone's own battery.
· Connect the board to an adjustable workshop power supply using specialized boot cables set to the phone's standard voltage.
3. Aim and Focus
· Place the bare board flat directly beneath the camera lens.
· Adjust the focus wheel until the edges of the tiny rectangular capacitors look perfectly sharp on your screen.
4. Power On and Observe
· Turn on the power supply and watch for an instant bright spot on the screen.
· If no heat appears, use tweezers to tap the power button contacts to prompt the board to boot up, then look for where the heat flares.

In summary, thermal cameras significantly enhance the diagnosis and repair process of mobile phones by providing precise temperature data and visual feedback. It helps to quickly identify faults, improve troubleshooting efficiency, and provide versatile applications in different repair scenarios. These advantages make them an indispensable cell Phone Repair Tool for professional repair technicians.


