Most people's first reaction to a cracked screen, aging battery, or charging fault is to send it to a repair shop, resulting in an expensive bill. In fact, as long as you understand the failure points, know how to repair them, and use the correct tools, most common mobile phone faults can be fully repaired at home. DIYPHONE will provide you with a detailed breakdown of the preparation work for mobile phone repair, core operational techniques, and how to avoid costly beginner mistakes.

I. Preparation Before Repair
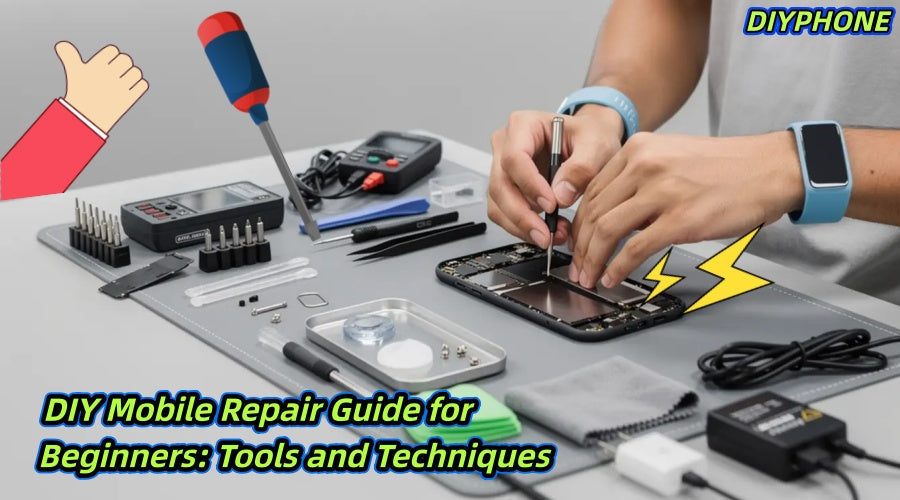
An organized, anti-static work environment is the prerequisite for ensuring repair safety.
1. Essential Tool List
· Precision Magnetic Screwdriver Set: You must be equipped with screwdrivers adapted to specific models, such as the Pentalobe and Phillips types commonly used by iPhones.
· Plastic Pry Tools and Picks: These are essential tools for removing housings and disconnecting connectors; metal implements must never be used as replacements to prevent scratching the motherboard.
· Suction Cup: Used to safely lift the display assembly.
· Hot Air Gun or Heating Station: Used to soften the internal waterproof adhesive of the phone, reducing the difficulty of disassembly.
· Isopropyl Alcohol: Specifically used to dissolve the strong adhesive in the battery compartment.
· Ceramic Tweezers: It is recommended to prepare fine-tipped, curved tweezers for grasping extremely small ribbon cables and screws.
· Anti-Static Wrist Strap: Prevents static electricity carried by the human body from damaging the phone's sensitive integrated circuits.
2. Efficient Workspace
· Magnetic Repair Mat: Prepare a Magnetic Storage Mat. Since screws in different positions of a mobile phone are often of different lengths, mixing them up is the number one cause of motherboards being punctured and scrapped. They must be classified and stored strictly according to the disassembly sequence.
· Well-Lit: Use a desk lamp for directional lighting to ensure that the location of every tiny connector can be clearly seen.
· Pure White Background Paper: Lay a sheet of white paper on the workbench. This will allow you to lock in the location of parts immediately if they pop off or fall.

II. Detailed Repair Steps
1. Screen Replacement
The screen is the most fragile part of a mobile phone; be sure to remain patient during replacement:
Step 1. Soften the Adhesive: Turn off the phone first. Then, use a heat gun to heat the perimeter of the screen evenly. Keep the temperature at about 60-80°C for 90 seconds. Do not fix the heat on one spot to avoid burning the internal circuits of the screen. Use a suction cup to lift a gap, then insert a thin plastic pick and slide it slowly along the edge.
Step 2. Disconnect Power: This is the most critical step! After the screen is lifted, the first thing to do is find the battery ribbon cable and disconnect it. Remember: Before any hardware disassembly, disconnect the power first. If pulling the battery adhesive tab is ineffective, drip a small amount of isopropyl alcohol around the edge of the battery, wait 30-60 seconds, and pry gently after the glue has softened.
Step 3. Functional Pre-test: Before peeling off the new screen protection film and installing it permanently, connect the new screen's ribbon cable first. Power on the device to test touch, color, and display to ensure there are no bright spots before installation.
2. Diagnosis and Troubleshooting
Not all mobile phone faults require opening the device. Before suspecting hardware damage, please rule out the following common issues:
· Port Cleaning: Intermittent charging is usually caused by dust accumulation in the port. Use Dust Clean Blower to clean it, or use a soft wooden toothpick to carefully hook out the lint. Strictly prohibit the use of metal needles; otherwise, once the metal pins inside the USB-C port are deformed, they will be irreparable.
· Data Cable Inspection: Observe whether the port pins are blackened or oxidized.
· Storage Management: Check if the storage space is below 10%. At this point, system cache operation becomes extremely difficult.
· Safe Mode: Try to enter the system "Safe Mode." If the phone runs smoothly in this mode, it indicates that a third-party application installed recently has caused a system conflict.

IV. Repair Suggestion
Repair is not only a craft but also a way to connect deeply with the digital world.
1. Practice with Old Phones
It is recommended that beginners do not practice directly on their primary device. Find a discarded, non-functional mobile phone of the same model as a "practice unit" and repeatedly disassemble, clean, and assemble it. Through this process, you can deeply understand the internal structure of the phone, learn where the stress points for clips are, where the folding paths for ribbon cables are, and where the adhesive distribution areas are. This extensive practice is something no theoretical tutorial can provide.
2. The Importance of Internet Resources
When encountering difficult problems, do not work in isolation. Professional repair communities, hardcore teardown bloggers on YouTube, and Reddit sub-forums for specific models are extremely valuable resources. When you find a stripped screw inside the phone or a connector that looks inconsistent with the manual, take a clear photo first and upload it to the relevant forum to seek help. Often, a single sentence from an experienced veteran can clear up the confusion.
3. The Value of Patience
In the repair world, the most expensive cost is not the parts, but operational errors caused by anxiety. Forcing a pry before the heating time is sufficient will lead to cracking the screen backplane; forcing the cover shut without properly connecting the ribbon cable will lead to functional failure. Set aside an adequate amount of time for yourself, and do not perform repairs when fatigued or in a hurry. When everything is ready, you will find that when the phone lights up again, that sense of accomplishment from solving the problem is incomparable.
V. Summary
Mobile phone repair is not a talent, but a skill accumulated through preparation, logical sorting, and patience. When you can restore a device without damaging a single screw, you will have the confidence to maintain your primary device. Stay calm, operate carefully, use professional Mobile repair tools, and start your DIY repair journey with this guide.


